This greenhouse will enable you to garden easily in difficult situations such as: short season, windy, low night time temperatures, animals eating your garden, low rainfall, high altitude, urban gardening, low humidity and/or cold winters. 이온실은 다음과 같은어려운상황에서쉽게정원이가능합니다 짧은계절,바람, 낮은야간온도,당신의정원을 먹는동물,낮은강우량,높은 고도, 도시원예, 낮은습도및 / 또는추운 겨울. *This greenhouse will allow you to garden all year with a wide variety of vegetables, regardless of where you live. 이온실은당신이 어디서 사는지 상관없이, 채소의다양한 종류를일년 내내정원에서 함께하실 수 있습니다. Because this greenhouse is permanent and passive solar, it is much more effective than season extension. 이온실은영구적인태양열이기 때문에훨씬더 효과적인시즌을확장할수있다.
Why I personally decided to build a greenhouse.
(태양열온실을 건축 하기로한 이유)
For three years back in the mid 1980s, I was a professional organic landscaper in Atlanta, GA (USA): Zone 8, only 800 feet above sea level, approximately 50 inches of rain a year, and a population that loved its trees, extravagant foundation plantings, and yet gardens with gusto despite the challenges of wind and harsh climate 나는 1980 년대 중반에서3 년 동안,표고 800피트이고, 일년 강수량이 약50인치이고,바람과혹독한기후의 도전에도 불구하고기품있는정원과 사치스런 재배와, 그들의 나무를 사랑하는애틀란타GA(미국)에서,유기농 전문조경사였다, After ten years of experimenting with straw bales, poly-covered tunnels, and several kinds of row cloth-all in an attempt to stretch the pitifully short 90 frost-free-day summer growing season - I was discouraged. 일년중 서리가 없는 여름동안의 90일 외에, 지난 10년동안 스토로베일, 비닐터널등 저렴한 방법으로 여러가지 온실및 월동방법을 실험해 보았지만, 결과는 실망스러웠다. (**위의그림 여러가지 온방실험 방법들)
Beset by 50 mph winds and hail the size of golfballs, my garden the fall of 1998 looked like it had gone through a Cuisinart. 1998년 나의 정원은 50/mph의 바람과, 골프공만한 우박으로 마치 쿠진 믹스기에 들어갔다 나온것 처럼 보였다. All the poly tunnels were damaged, the mole population had skyrocketed, and temperatures in the teens in mid-September killed the peppers and eggplant just as they were reaching full maturity. 모든 폴리터널은 망가졌다, 그리고 사마귀 숫자가 급증했고, 9월 중순에 10도의 온도는 다자란 후추,가지를 못쓰게 만들었다. It was time to build a greenhouse! However, the available mail order kits of polycarbonate or glass, and the polyethelene hoop houses are both what I refer to as “freeze or fry” style greenhouses. 온실을 건설하기위한 시간이 되었습니다.!그러나폴리 카보 네이트또는 유리와polyethelene의후프하우스 등으로 우편 주문키트는 "얼거나 튀기는'스타일의온실입니다.
Because there are all glazing and their foundations aren’t insulated (or don’t exist) they must be heated in the winter to prevent freezing. 거기에모두유리이고그들의기초가(또는존재하지않음)절연있지 않기 때문에그들은동결을 방지하기 위해겨울에 온방을 해야합니다.
They also get very hot in the summer and must be well ventilated and cooled. 또한여름에매우뜨겁고,통풍이 잘되고 냉방이 되어야한다.
So I decided to design and build a passive solar greenhouse that would fulfill the sustainable agricultural principles of affordability, usefulness, durability and efficient use of local resources. 그래서경제성,유용성, 지역자원의내구성 및효율적인사용의지속 가능한농업원칙을 이행것이수동적인태양열온실을설계하고구축하기로 결정했습니다
The design of the passive solar greenhouse can be modified to fit your locale by: a) adjusting the angle of the glazing wall, b) increasing or decreasing the depth of the insulated foundation, c) increasing or decreasing the size of the fan and side vents, and d) using shade cloth as necessary.
패시브태양열온실의설계하여 장소에 맞게수정할 수 있습니다: a)유리벽의각도를조정 b)증가또는절연기초의 깊이를감소, C)증가또는팬과측면통풍구의 크기를감소하고, d)필요한그늘의피복을사용합니다.
Building a greenhouse is a wonderful way to learn a new skill if you are not already a carpenter. When I began, I couldn뭪 read a blueprint and had built nothing more complicated than a basic book shelf.
The building process is a good way to engage your community. Many neighbors and local high school students assisted at various times, learning as they helped.
Once completed, the greenhouse produces a lot of food year round, enabling a family to eat good home-grown organic vegetables regardless of weather conditions or grocery store availability.
Building the passive solar greenhouse
Features � Insulated foundation: you can add or subtract from our two feet of below grade insulated foundation to customize the greenhouse to fit your USDA zone and average winter climate.
� Rear straw bale wall: uses the waste of barley farming to create an inexpensive R-40 super insulated north wall.
� Polycarbonate glazing: a difficult to break, lightweight glass alternative that is user-friendly, doesn뭪 burn the plants, and is guaranteed for ten years against yellowing, even at high altitudes.
� Super-insulated side walls and roof: uses newer, less itchy fiberglass and a foil/bubble wrap material that insulates (bounces back radiant heat), serves as a vapor barrier, and reflects light back toward the plants.
� A 1,225 gallon cistern: stores and recycles rainwater (plants preferred water source), a must for rural areas that lack a (reliable) well and a safeguard against drought and water rationing in these climatically uncertain times. The size can be adjusted to fit the rainfall pattern and amount in your locale.
� Passive solar water wall: 900 gallons of water in a combination of recycled white plastic and new black metal five gallon buckets. These store heat from the sun during the day (in winter) and release the heat to the air a night. In summer, the water helps keep the interior of the greenhouse cooler.
� Active solar fan and vent: uses the sun to run the ventilation system (augmented by human operated vents). The size, placement, and number of vents can be customized to fit your heat and humidity profile.
� Two growing beds: the interior of the greenhouse is about 35'4" long by 10' wide, or approximately 353 square feet (not including the water wall). The two beds are 4' wide and contain about 282.5 square feet of useful growing space for plants. *구글번역 사이트 http://www.irisherbal.com/psg/content/process.html *구글번역사이트 그대로 옮겼습니다. 차후 시간되는대로 번역하겠습니다.
건물 프로세스
온실을 건설하는 것은 이미 목수하지 않은 경우 새로운 기술을 배울 수있는 좋은 방법입니다.내가 시작했을 때, 나는 뭪 나오지 않았어 청사진을 읽고 기본적인 책을 선반보다 더 복잡 내장 아무것도 없었다.
건물 과정은 지역 사회에 참여하는 좋은 방법입니다.많은 이웃과 지역 고등학교 학생들은 다양한 시간에 도움 그들이 도움으로 학습.
완료되면, 온실 관계없이 기상 조건이나 식료품 점 가용성 좋은 집에서 재배 한 유기농 야채를 먹고 가족을 가능하게 라운드 음식 연도를 많이 생산하고 있습니다.
수동 태양열 온실을 구축
월 ~ 8 월
우리는 남부 노출 배향, 건물의 풋 프린트를 측정하고, 타자 보드 및 문자열을 넣어 차가운 월 아침에 시작했다.
백호는 주변 트렌치를 파고 후 철근을 배치하고 기초 공동했다.그런 다음 시멘트 트럭이 와서 친구와 이웃이 부어에게 처음으로 도왔다.
거품 형태와 철근은 절연 기반을 만드는 현대의 건설자 세트처럼 함께했다.여기에 우리가 부어 (후면 스트로 베일 벽 및 물 벽) 슬래브 및 기초 콘크리트를 위해 준비하고있다.
기초 및 슬래브는 짚 bales의 처음 두 코스 철근을 포함하여 수행됩니다.여섯 게시물의 두 포스트와 빔 리어 스트로 베일 벽에 대 한 장소에 있습니다.큰 검은 물체는 1천2백25갤런의 탱크입니다.
여기에서 우리는 이전에 짚 bales의 첫 번째 행의 위치에 철근을 찌른다 플라스틱 증기 장벽을 tarring 있습니다.
창 문턱 또는 바닥 판, 남쪽 무릎 벽에 내장 된 앵커 볼트 재단에 부착되어, 지금 우리는 벽을 유약 남쪽을 건립한다.이 두 부분에서 수행하고 괄호에 의해 장소에서 개최되었다.
다음으로 동쪽과 서쪽 벽은 통풍구 및 팬을위한 컷 아웃으로 건설되었다.이러한 측면 벽은 후방 게시물 및 빔 벽에 부착했다.빨대 베일 벽 건조를 유지 덮여 유지 하였다.
남쪽 유약 벽 프레임은 폴리 카보네이트 (힘든, 내구성, 경량의 종류, 투명 플라스틱)를 체결에 대한 펄린 (십자가 조각)와 여기에 볼 수 있습니다.당신은 많은 칼라 타이 중 하나, 서까래, 갑판의 첫 번째 행, 및 외부 벽 (3/4 인치 CDX 합판) 볼 수 있습니다.또한, 거기에 액자 문 개구부의 하나이며 우리는 환기 팬이 장착 될 위치에 노력하고 있습니다.
이 온실의 후방도이다.우리는 지붕 갑판을 완료하고 15 파운드 지붕 용지를 측정한다.
여기에서 우리는 탱크의 기초를 마무리된다이는 배수구를 통해 지붕 떨어져 물을 수집하고, 술고래 호스 및 점적 관수의 방법으로 식물에 물을 제공합니다.
지역의 젊은 성인들은 스트로 베일 벽 (내부 및 외부)에 시멘트의 첫 번째 코트에 넣어 치장하는 방법을 배우고있다.또한 벽 프레임과 동쪽과 서쪽 벽에 합판을 유약 남쪽에 나무 실러의 첫 번째 코트를 넣어.
우리는 홈 스트레치에 전자 뭨!폴리 카보네이트는 점멸 및 금속 정지 완료 프레임에 부착되어, 서쪽 벽에 스크린 도어가 걸려와 통풍구 중 하나가 장소에 있습니다.나중에 가을에 우리는 최고 태양 벤트를 설치 한 외부 도어를 걸려는 유리 벽의 하단에 홈통을 넣어, 그리고 유리 벽에서 물을 받기 위해 주식 탱크에 파고.
여기에 장소에 알루미늄 팬 셔터, 동쪽을 뭩.나중에 가을에 우리는 외부 문을 걸어 하단 통풍구를 만들어 지붕에 태양 전지 패널을 넣어, 설치 및 태양 광 팬을 줬습니다.
풍모
절연 기초 : 추가 또는 재단이 USDA 영역과 평균 겨울 기후에 맞게 온실을 사용자 정의 절연 아래 등급의 우리 두 피트 뺄 수 있습니다.후면 스트로 베일 벽 : 저렴한 R-을 만들 보리 농업의 낭비를 사용 40 초 절연 북쪽 벽.폴리 카보네이트 글레이징 : 휴식하기 어려운, 경량 유리 대체 사용하기 쉬운, 심지어 높은 고도에서 식물을 구울 뭪 아무튼, 황변에 대하여 10 년 동안 보장된다.슈퍼 절연 측벽 지붕은 :. 새가 덜 가려운 유리 섬유 및 단열 호일 / 버블 랩 재료는, (다시 복사열을 반사) 증기 장벽 역할을하고, 다시 식물을 향해 빛을 반사 사용하는저장하고 (빗물을 재활용하십시오 1천2백25갤런의 탱크를 잘 식물 선호 수원), A (신뢰성이 부족한 농촌 지역에 대한 필수) 이러한 기후 적 불확실한 시대에 가뭄과 물 배급에 대한 보호.. 크기는 당신의 지역에 따라 강수량 패턴과 양에 맞게 조정할 수 있습니다재활용 흰색 플라스틱과 새로운 검은 금속 5 갤런 양동이의 조합 물 9백갤런 : 수동 태양열 벽.이 스토어 (겨울에) 하루 동안 태양으로부터 열은 밤 공기에 열을 놓습니다.. 여름에는 물이 온실 쿨러의 내부를 유지하는 데 도움이환기 시스템 (인간의 운영 통풍구에 의해 증강)를 실행하기 위해 태양을 사용하여 활성 태양 팬과 통풍구.. 구멍의 크기, 위치 및 번호는 고온 다습 프로파일에 맞게 사용자 정의 할 수 있습니다포함하지 않음 (온실의 내부는 "긴 (10)에 의해 '폭, 또는 약 353평방피트에 대한 35'4입니다 : 두 개의 성장 침대 물 벽). 두 개의 침대가 넓은 '4이며, 식물에 대한 유용한 성장 공간의 약 282.5 평방 피트가 포함되어 있습니다.
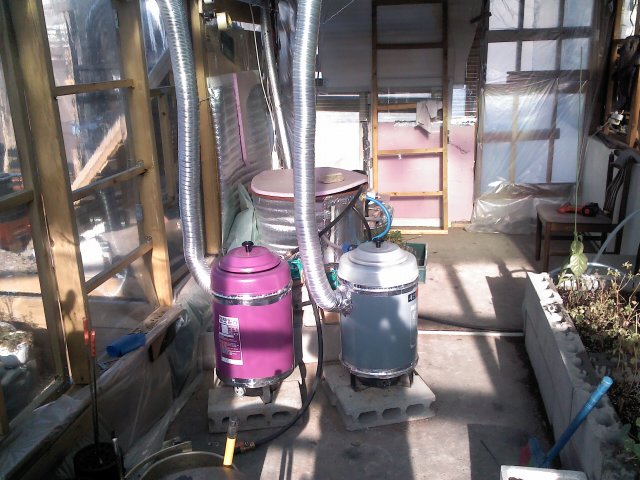
“ 자작 태양열 온수보일러(연탄보일러와 연동) ”
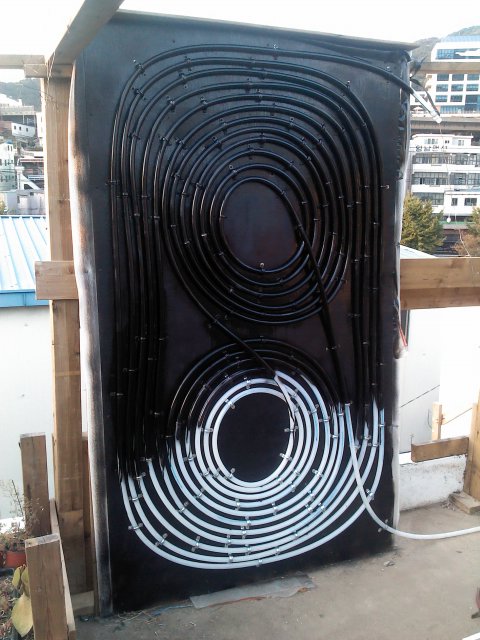
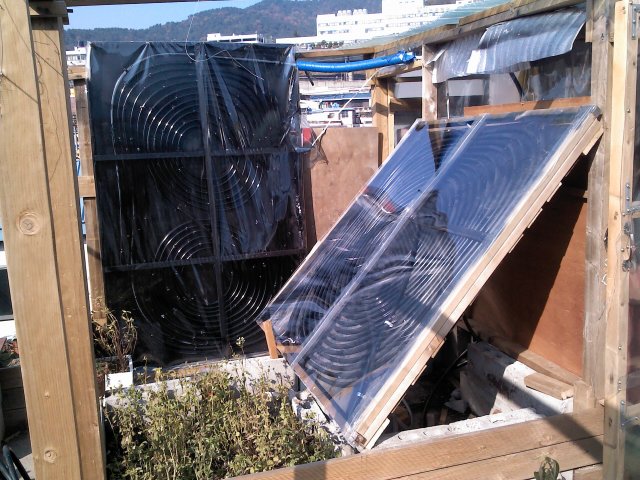
1.태양열 온수기 만들기: 허브리조트 부산사무실에 마련된 옥상정원 약35평중 온실시설이 된 약25평의 겨울 난방을 위해 저렴하고 효율적인 태양열 온수기와 연탄보일러를 접목 시킬 계획으로 자작하였습니다. 제작과정은 관련도서 "태양이 만든 난로 했빛온풍기" 와, 유튜브,구글사이트등을 참조하였습니다. ㄱ.집열판 만들기 집열판의재료는 여러가지가 있지만, 가장 저렴한 방법을 택해, 엘셀파이프와, 지온호스를 사용하였습니다. 장소가 좁은 관계로 집열판 두개를 병열로 묶어 두개의 효과를 보았습니다. 결론적으로 적정한 넓은 장소와 보조시설(반사판등)을 설치하면 상당한 효과를 가져올것입니다. 첫번째 집열판은 엘셀파이프에 검은색 스프레이 페인트를 사용하였습니다. 효율성은 동파이프등이 좋으나,비용상의문제로 시도하였으나 엑셀이 했빛에 노출 되었을때 부식등을 감안 하여야 하겠습니다. 두번째 집열판은 지온호스(검은색 파이프)를 사용하여 비용및 효율적인 측면을 커버 하였습니다. 엑셀 15mm 한마끼 35,000원(70m), 지온호스15mm 한마끼 45,000원(200m) 로 비교가 됩니다.
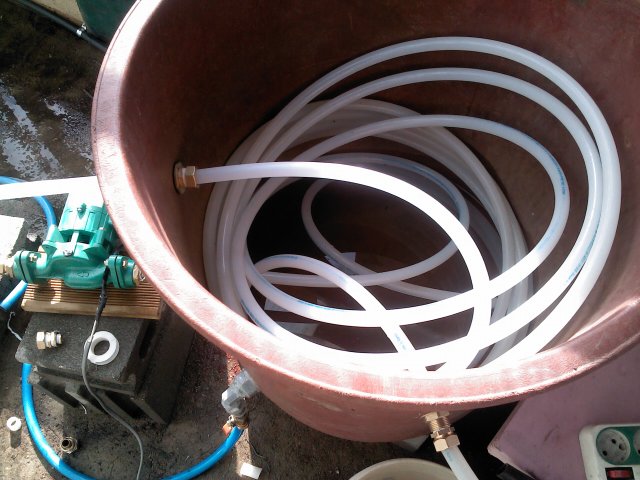
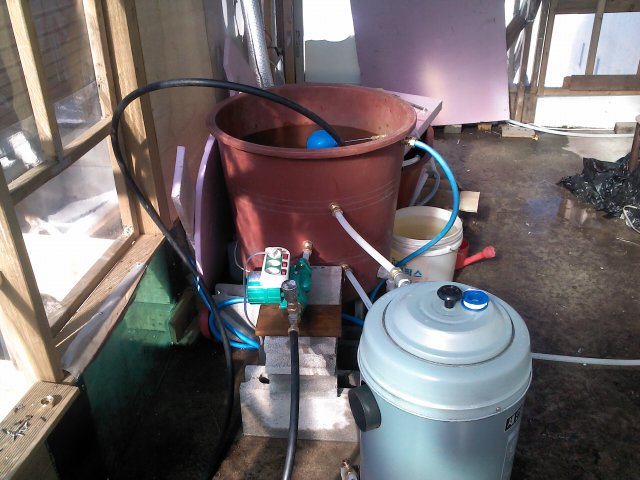
2.온수탱크 연결 시중 판매 온수탱크 대신 "빨간다라이"를 사용하였습니다. 단열을 추후 보완하여야 하겠습니다. *온수 순환모터를 사용하여 순환 시켰습니다. (1개 3만원~3만5천원) 3.열교환기 역시 열교환용으로 동파이프등 효율성이 좋으나, 역시 비용상문제로 엑셀파이프로 대체(훌륭함)하였습니다.
**열교환용 부동액통 겨울 동파방지를 위해 부동액을 넣는 통을 마련하였습니다. 이로서 태양열 온수기 완성 하였습니다. 아무리 추워도 했볓만 쨍쨍하면 따끈할 정도로 더운물이 만들어 집니다. 연탄보일러와 연동하기 위해 저장조를 데워 야간 연탄보일러 가동할때 실내온도를 올려 주는데 톡톡한 역활을 합니다. 역시 축열조가 완벽하면 이론상으로 태양열 온수기 만으로도 난방이 가능하며, 적절한 시기에 실행해 보겠습니다.
** 연탄보일러 설치 1구 3탄 짜리를 처음에는 1개 설치하여 가동해보니 조금 약해 2개를 사용하니 만족할만한 온도가 나왔습니다. 했빛이 있는 날은 밤에만 연탄보일러 가동이 가능 했습니다.
After meeting a good friend for lunch today and telling her all about my latest and greatest events in my life she has insisted that I start a blog and log my journey with everyone else on the planet as a witness. What she seems so interested in was our new greenhouse and growing system that we put in.
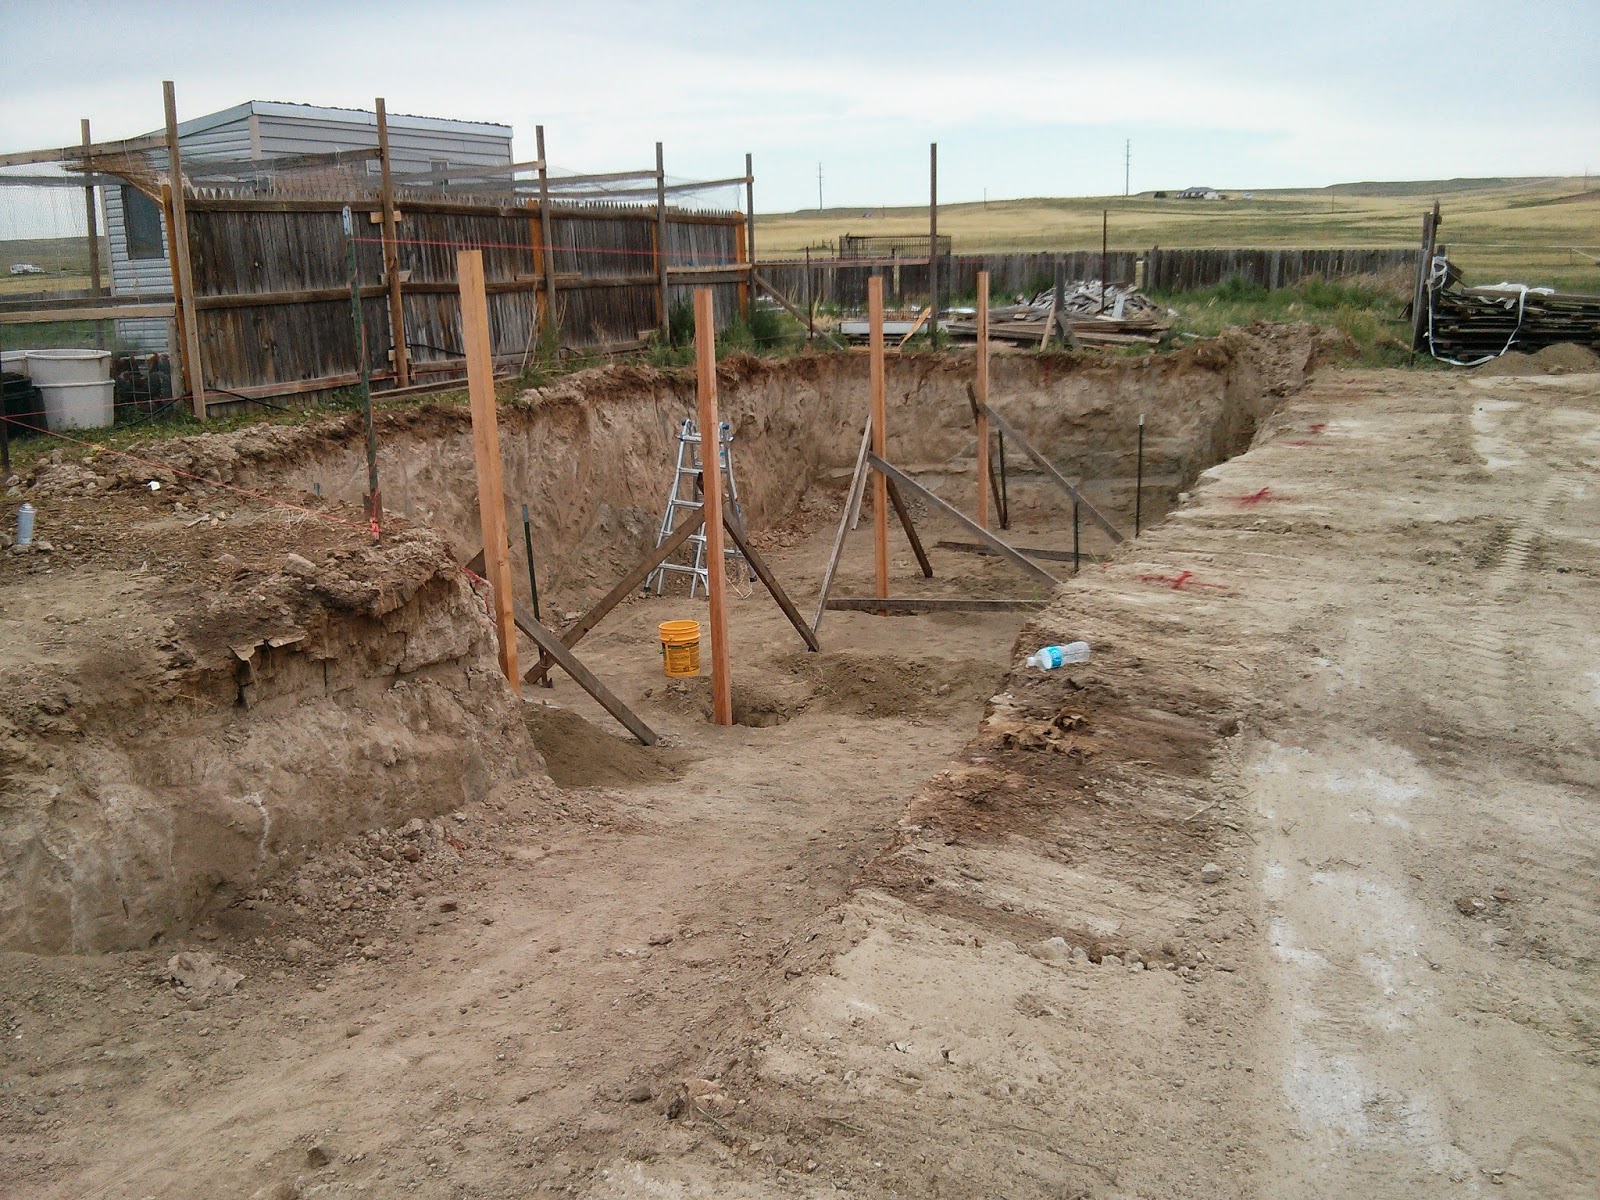
What I have come up with was a combination of a Walipini (underground greenhouse) and an Aquaponic system. The walipini was a no brainier for us as we live out on the prairie. Wind and hail are a norm for us. All the normal greenhouses that you can buy from box stores and such are just no match for what mother nature has in store for us out here. Sure I could buy one, but a day later someone in Kansas would be happy with my new purchase! Therefore after lots of searching and research we decided that a walipini was right for us.
Our Walipini has an inner dimention of 20'x36' and is 6' deep. We also added a ramp big enough for a bobcat in case we ever needed to get something big down there. Yes, we live on acreage in case you were wondering. :)
Post holes down the middle
Set the 12' 4x4 posts. 3' in the ground 9' above
Added a middle beam 2x6's
12' 2x4's going from middle to the sides
The outer dimensions are 24'x40' The rafters span 2' over the ground on all sides of the walipini.
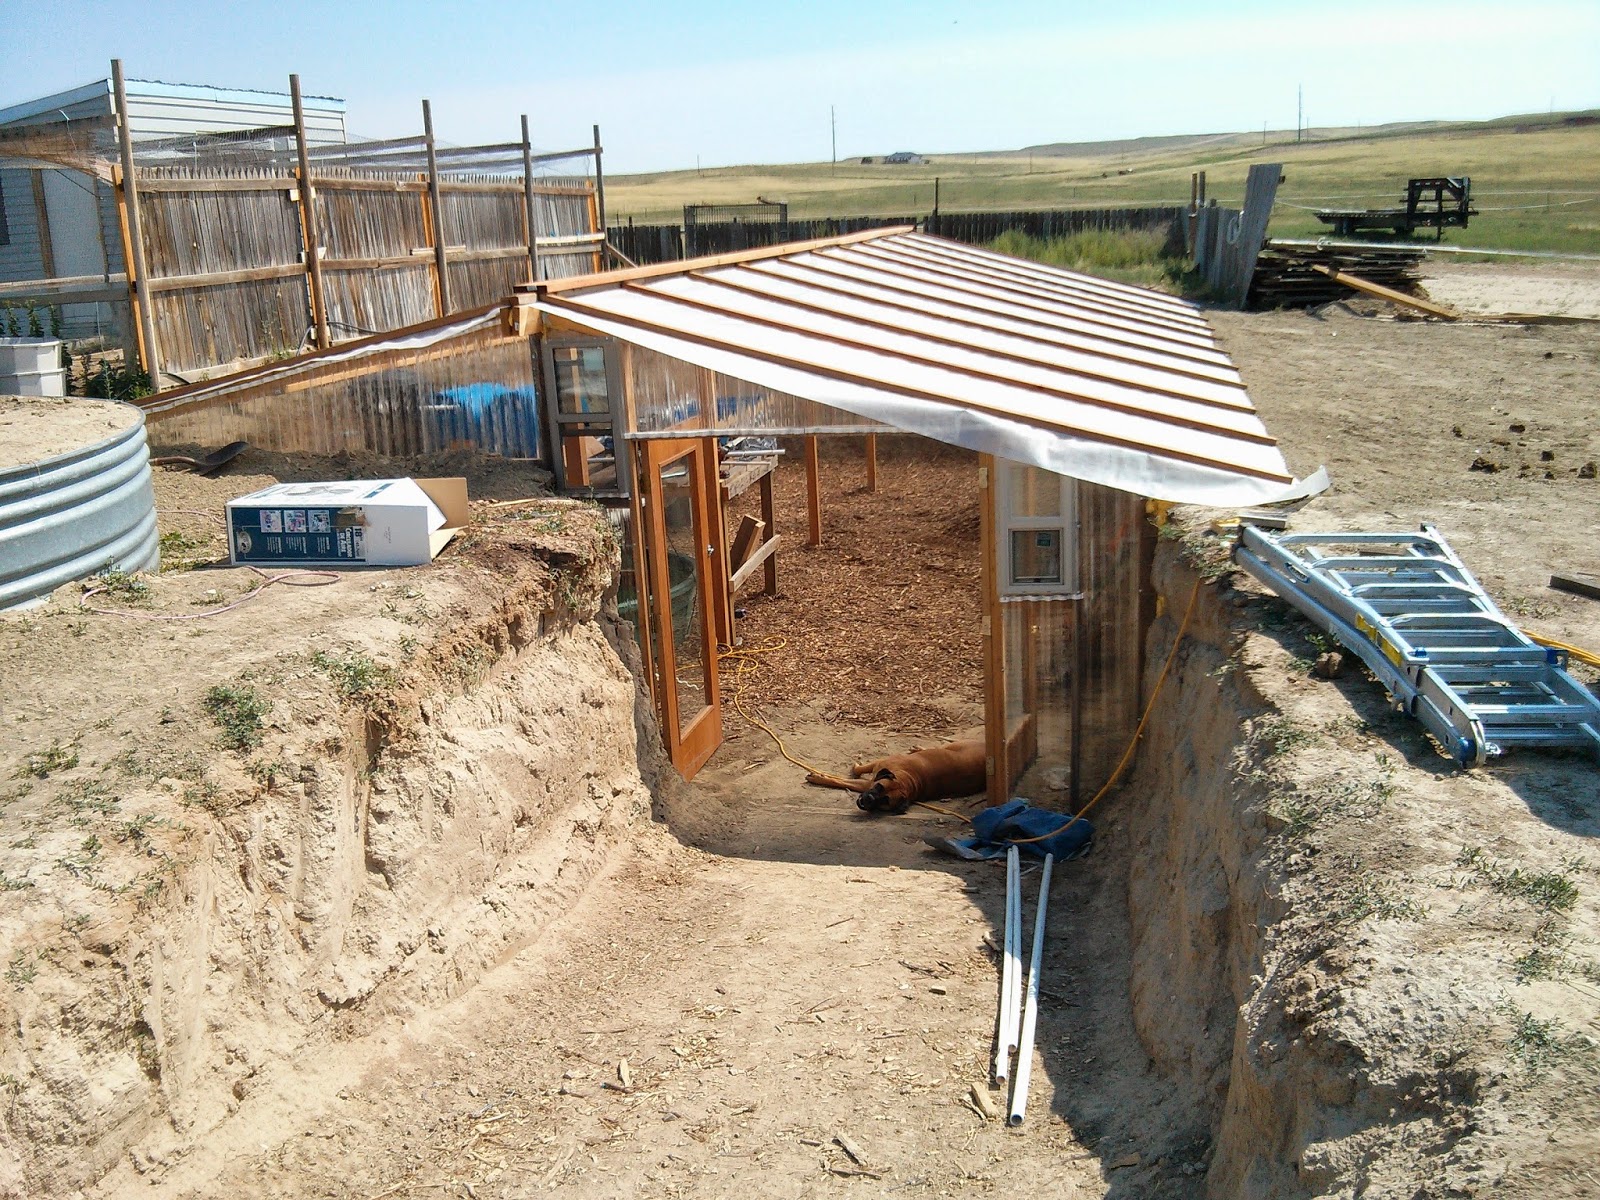
I found some used doors on craigslist for $60 and 3 used small windows for $60. Also, we added some used mulch from the city to add a nice cushy layer on the bottom before we put the top on.
For now the top on the walipini is a clear greenhouse tarp I found online at Farmtek. Great store and very helpful if you call in to chat with them about your project.
Added another 2x4 to the top of the tarp to hold in place
For the sides above the ground we used the clear poly roof material for now. It works and does what we needed it to do...let in sunlight!
We put back our wood fencing around it to add a little more protection from the wind. The top middle line only is about 3' off the ground. You can't see this unless you are close to it or in a plane.
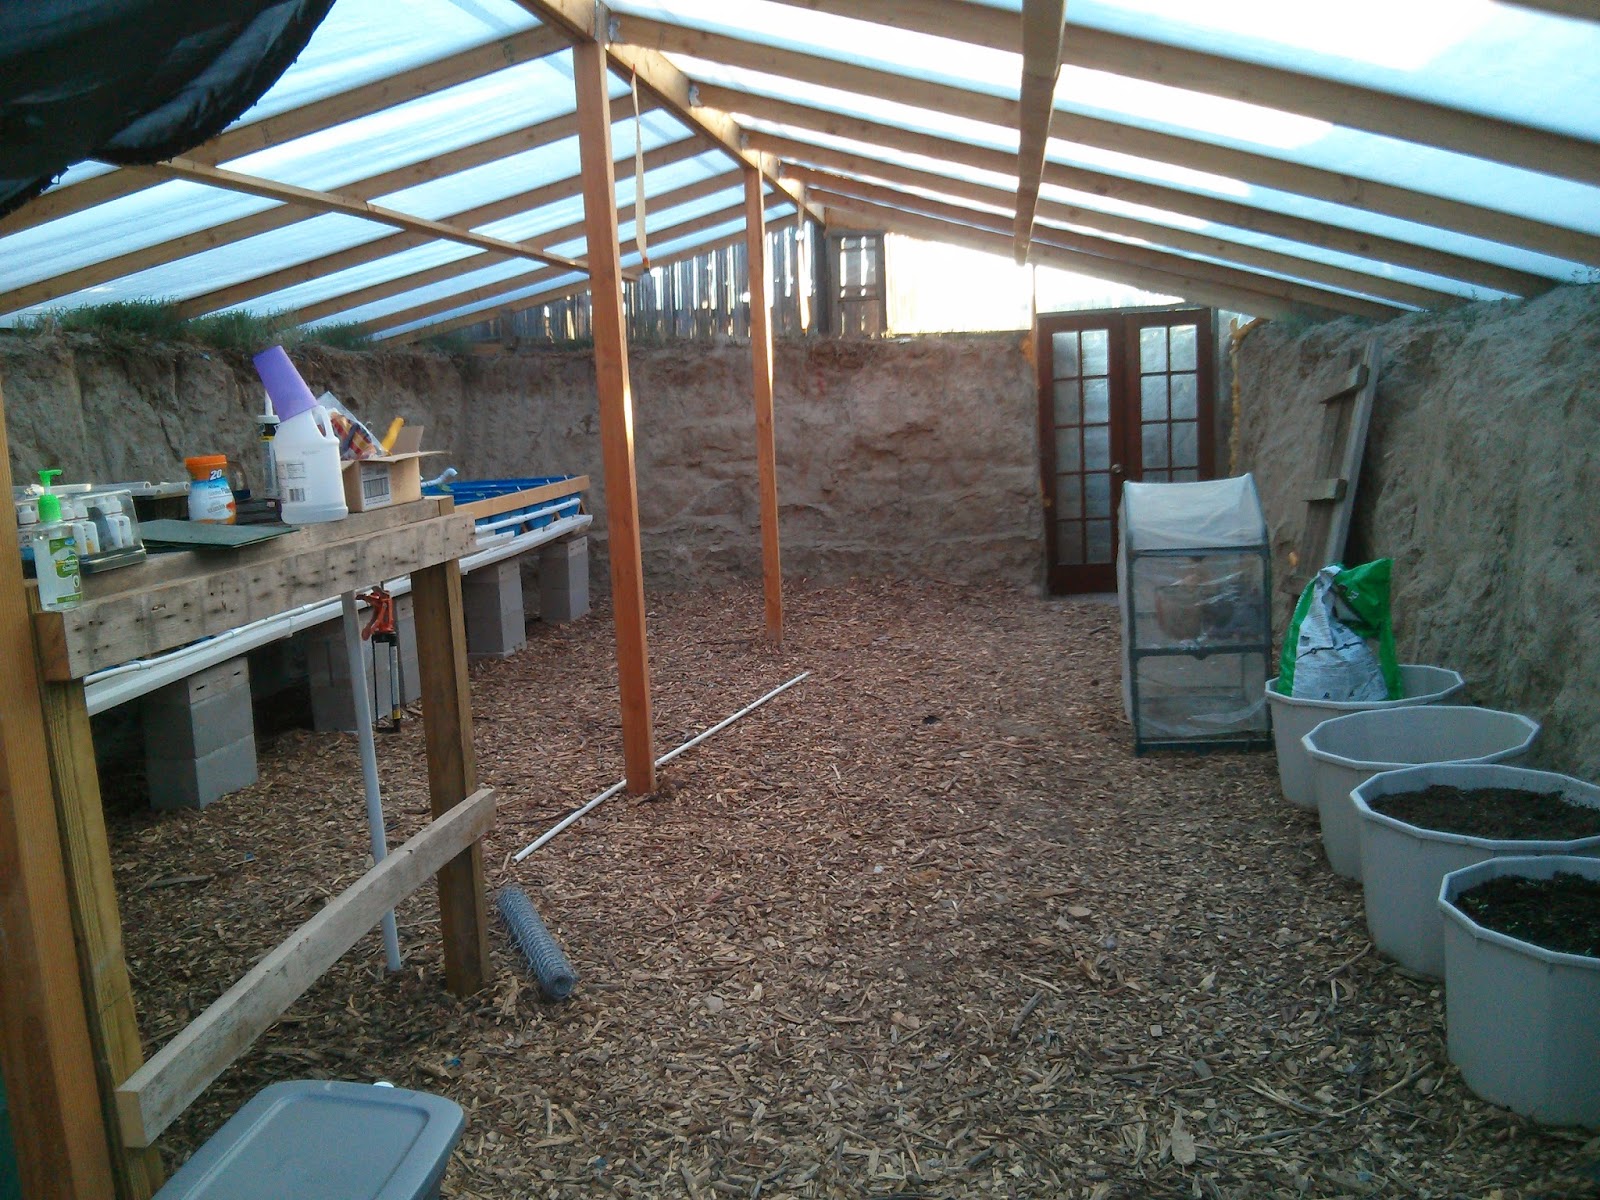
The inside is cozy and we love it!
From start to finish this only took us about 2 weeks to put together. All posts down the middle and sides were concreted in. We made the frames for the doors on either end. On the warmer days all windows and doors are open to allow for a draft. This last photo was taken in the AM just as the sun was coming up.
Hope you enjoy our journey as much as my friends and family have so far. It seems we are always trying and coming up with new things to try. I will post more about our Aquponics system in the next blog.


 태양열온실
태양열온실


 전체글 보기
  전체글 보기


 psg_2lg.jpg